Joseph Herrin (06-07-2012)
As promised, I am posting some information on setting up a solar power system. My experience is in using such a system with an RV, but the basic principles would apply equally to a small home system.
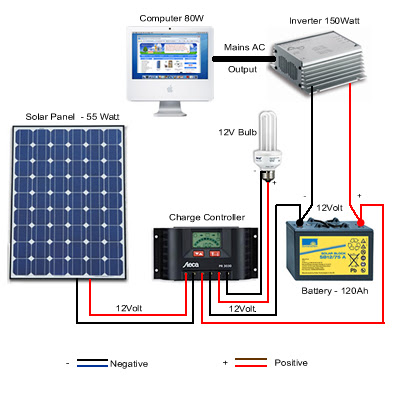
Solar Power System
The image above provides an excellent starting point for discussing setting up a solar panel power system. All of the basic parts of the system are portrayed. These parts consist of the following:
Solar Panel
Charge Controller
Battery
Inverter
Appliances
Of course, these items can be plural according to how large a system you are setting up, but these are the basic elements. Before I discuss what each component does, and how to choose the appropriate items, let me begin by sharing some preliminary information.
Before you begin to choose your system components you need to know what you plan to run on your solar power system. Setting up a solar power system can be an expensive proposition, so you need to give much thought to what you will do with it. The more you can pare down your power needs, the better off you will be. As I have mentioned in another post, it is far more cost effective to reduce your electrical current needs by replacing inefficient appliances and electrical devices than it is to purchase enough solar panels, batteries, and other components to run wasteful devices.
I have a thirty foot school bus converted into a motorhome.
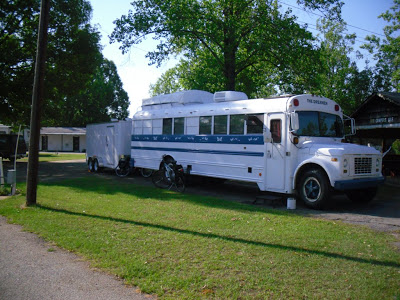
Recent Picture of The Dreamer with Trailer
I have been living in my bus for a year and a half now as a full-time RVer. During this time I have been making it more energy efficient. When I painted the outside of the bus I added a space age ceramic additive to the paint that I applied to the roof. This additive greatly reduces the amount of heat absorbed. You can find the product in powder form that I purchased at the following link.
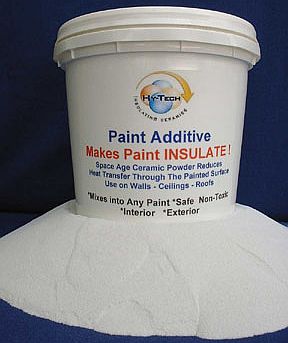
Hy-Tech Paint Additive
You just mix this into your paint prior to rolling it onto your surface to be painted.
Another thing I did was to apply mirror tint to all of the windows on the bus. This also greatly reduces heat absorption. The mirrored tint I used can be purchased at Lowe’s or Home Depot. It acts like a one way mirror. You can see out from the inside, but from the outside it looks like you are looking into a mirror.
Also, I kept as many windows as possible unblocked so that I could open them up and get air circulation inside the bus during moderate temperatures, and if I am ever unplugged from the power grid and need some ventilation. All of these windows are screened to keep insects out. Additionally, my front door has a screen, and it too can be opened to increase air circulation.
Inside my bus all of my lighting is 12 volt DC. The fixtures originally came with standard incandescent bulbs, but I replaced them with LED bulbs. LEDs bulbs can be purchased to fit practically any 12 volt light fixture. They are just as bright if you purchase the appropriate bulbs. They produce less heat and most significantly, they use only about 1/10th of the power of standard incandescent lighting.
Following are two types of LED lights I have purchased, and the vendors I got them from.
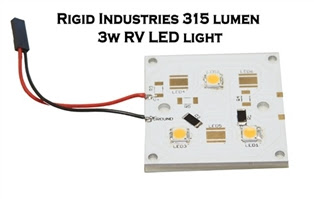
https://www.rigidindustries.com/category-s/144.htm
The light pictured above is simply amazing. It puts out a remarkable 315 lumens while using only 3 watts of power. 315 lumens is a lot of light. You may notice that the wiring has no connector for a light fixture. When you order these lights you specify what type of connector you need for your lighting fixtures and they plug right in to the wire end pictured above. There are five different bulb base types to choose from which should match up with practically any 12 volt light fixture you have.
The light pictured above costs $19.99. I have 8 lights in my bus that use this LED light. The company also sells a brighter 450 lumen LED that costs $24.99 each. I purchased 4 of these to go over my computer work area and in my kitchen where I need more light. As you can see, the cost can add up when purchasing these LED lights, but these lights will last many times longer than incandescents. In fact, I may never need to replace them even if I keep my bus ten years or more. Despite the high cost of the LEDs, it is more cost effective to pay for them than it is to add more solar panels and batteries which would be required to run incandescent bulbs.
In other areas where I need less light I have some small round 12 volt dome lights. These use what are called festoon bulbs.
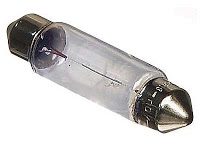
Festoon Bulb
You can purchase LED replacement lights that fit in the exact same fixture without having to do any modifications.
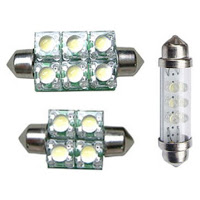
Festoon LEDs
Pictured above are several types of LED replacement lights. You can purchase these on Ebay or from Amazon’s website. A word of caution though, some of these bulbs are very cheap and you get what you pay for. I had some that the LEDs began failing n immediately. This sent me back to do more research and I am quite happy with the LEDs I now use. They are much brighter than my previous ones, and they are not burning out. Following is an image of the type of LEDs I purchased.
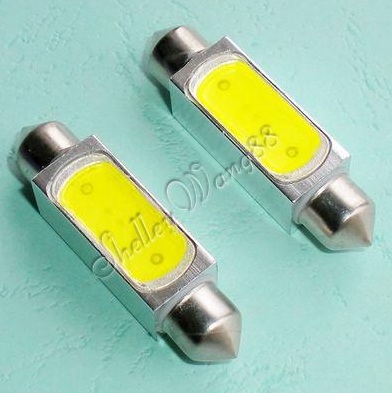
These have the large single LED and I have found that they put out more light than the ones with multiple small LEDs and they seem to more durable as well. This particular LED is sold 2 in a pack for $10 on E-bay.
Note that when buying Festoon LEDs you need to purchase them in the correct size to fit your socket. The 41 mm LEDs above fit my sockets well, but you may need a different size for yours. Also note that many of these light fixtures and bulbs are polarized. This means that if you stick them in the socket one direction they will not light up, but if you flip them around they will. Don’t plug the LED light in and think it is defective if it does not light. You may have it in backwards.
As I mentioned in a previous post, there are many appliances in my bus that I do not plan to run on solar power as they draw too much current. My toaster, microwave, Panini grill, bread machine, crock pot, and refrigerator are items I will not run on my solar power system. They are too inefficient and building up enough solar panels and batteries would be cost prohibitive. I purchased a portable freezer/refrigerator that is in my trailer. It uses only 1 amp of power whereas the refrigerator in my bus uses 2.7 amps. The freezer in the trailer uses 37% of the power of the less efficient one.
In place of the microwave, toaster, crock pot, and bread machine, I can use my stove and oven that run off of propane. One tank of propane lasts me nearly a year at current usage. I also have a rocket stove and a solar oven to use when I am off grid. The rocket stove will cook basically anything you can throw in a pot or pan on a stovetop while the solar oven will cook the types of things you would normally cook in a crock pot or oven. It also bakes bread very nicely.
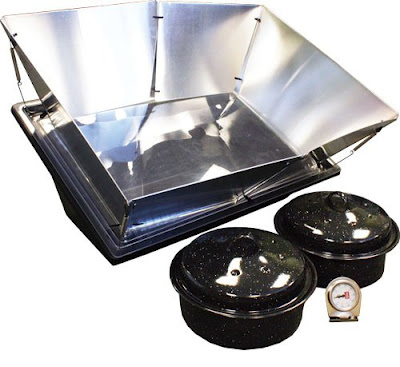
SOS Solar Oven
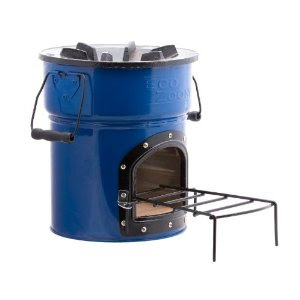
Zoom Dura Rocket Stove
http://ecozoomstove.com/developing-world.php
As far as heating my bus during the wintertime, I have a wood stove installed. Overall, I have greatly reduced my electrical energy demand for those times I will be off-grid, or when shore power will be unavailable. I have two 55 amp hour batteries in my bus that should be sufficient to power my LED lights, as well as the 12 volt pump on my potable water system. I will also be able to run a fan or two for limited periods of time from these batteries. That is all I plan on using them for.
In my trailer I have a single battery that has a capacity of 153 amp hours. It will be used to run my freezer, my grain mill, and to charge my laptop computer or run other small appliances as needed.
Once you have done the preliminary work and reduced your electrical needs as much as possible, you are then ready to begin selecting your solar power system components. You need to perform a calculation to determine your power consumption. There are a number of sites on the Internet that provide solar power calculators. Following is one example.
http://solar-panelbatterycharger.com/know-your-solar-power-needs-in-3-easy-steps/
Let us assume you have done the calculations and you have determined that you will use 70 amp hours of power per day. You can now select your system components based upon this information. Let me begin with the battery (or batteries) first. You need to purchase batteries with twice the capacity that you calculated. The reason for this is that batteries are rated by the total amp hours of power they can hold, but you cannot drain a battery more than 50% or you will damage it. So, let us figure on a battery capacity of at least 140 amp hours. It is good to give yourself some excess capacity for there may be days when it is raining, snowing, or overcast when your solar panels cannot charge your batteries back up fully. How much excess capacity you plan is up to you and would differ by climate and the size of your pocketbook.
Some of the best batteries to use for solar power systems are Absorbed Glass Mat (AGM) batteries. These are more expensive than your standard lead acid car batteries, but they have major advantages. Most of them last 2-3 times longer than lead acid batteries. They are completely sealed so you never need to add water. Because they are sealed they do not emit toxic gases, and they will not spill. They are also less susceptible to damage from vibration and can be installed at practically any angle, even laying on their side, without damaging them.
One of the top recommended brands of batteries for small solar power systems is the Sun Xtender line manufactured by Concorde. You can read about them here:
The 153 amp hour battery I purchased cost approximately $400 when shipping is factored in. I purchased it from the following company who shipped it quickly and it arrived in good shape via UPS. The battery weighs about 90 pounds.
http://www.centrix-intl.com/details.asp?productid=9414
In my bus I have two AGM batteries manufactured by Optima. You can purchase Optima batteries from many of the local automotive stores such as Autozone or O’Reilly. They come in a range of amp hour capacities, but you won’t find them with as high of a capacity as the Sun Xtender batteries. I purchased these because I was able to acquire them locally a couple years ago. Optima makes red top, yellow top, and blue top batteries. The yellow or blue can be used for a solar system, but the blue is the best choice as it is a true deep cycle battery which means it can withstand deep discharging without damaging the battery. A deep discharge would be approximately 50% of the battery’s capacity.
It should be noted that deep cycle batteries sold for solar array systems come in 6 volt and 12 volt varieties. If you have multiple batteries and want your output to be 12 volts, you need to wire them together accordingly. If you wire batteries in serial the voltage of the batteries is added together. Thus two 6 volt batteries wired in serial will give you a 12 volt output. If you have two 12 volt batteries and want the output to be 12 volts, you must wire them in parallel. Following is a diagram showing the difference in the wiring pattern.
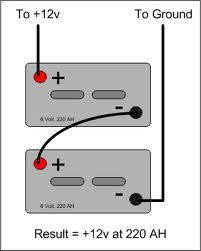
This diagram shows two 6 volt batteries rated at 220 amp hours each wired serially. The output voltage is 12 volts at 220 amp hours.
Serial Wiring
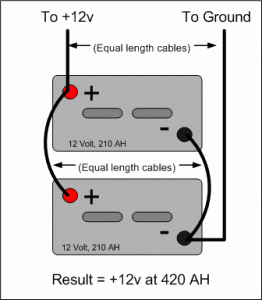
This image shows two 12 volt batteries rated at 210 amp hours each wired in parallel. The output voltage is 12 volts and 420 amp hours.
Parallel Wiring
Along with your batteries, the most expensive components of the solar power system are the solar panels. Prices have come down markedly in recent years when one looks at how many watts of electrical energy one gets per dollar, but they are still an expensive item. You will find two basic types of solar panels today. These are monocrystalline panels and polycrystalline panels. The monocrystalline panels produce more energy in the same amount of space. Therefore, if you have high power needs and limited space you will definitely want to look at monocrystalline panels. They are more expensive than the polycrystalline, unless you find a very good deal on them. Some websites report that the polycrystalline has less of a performance drop in cloudy weather or partial shading, but this is probably a marginal difference at best and is disputed. The polycrystalline cells have been making great improvements in manufacturing in recent years and there is not much difference in performance when you purchase a good quality polycrystalline panel.
The best prices on solar panels are often found by shopping the Chinese vendors on E-bay. Due to language barriers the descriptions are at times somewhat lacking. The following panels on E-bay are what I actually ordered. This is a very good price comparatively for four 140 watt panels. With some of the big name manufacturers like Kyocera, Sharp, or Siemens, you would not get half the wattage for the same price.
You may note in the description that it states these are “Mono Cell Solar Panels,” but below it states these are “polycrystalline solar panels.” I really do not know which they are, but this was not a big issue for me. I was mainly focused on the electrical performance of the panels and the specifications are clearly listed in a table on this page. Just as important to me was the price, and this is the best price on new panels I have come across after much searching online at Amazon, Craigslist, on manufacturer’s and solar retailer’s websites, and E-bay. I will state that I have not received the panels yet, so I cannot give you a review of them. However, they did ship out quickly. I have been tracking them as they have gone from China to Alaska to Indiana in the past 36 hours. They should arrive here in Georgia in the next couple days.
To determine what wattage solar panels to purchase, I have found the following rule of thumb posted online. You can get a ballpark figure on how many amp hours of electricity a solar panel will generate, by taking the advertised watt rating and multiplying it by 0.3. The product of the equation will reveal how many amp hours the panel will generate in a 24 hour period. So, if I have purchased four panels that are rated at 560 watts, I can anticipate deriving 168 amp hours of electrical power from them daily. (560 x 0.3= 168)
My batteries have a combined capacity of 263 amp hours. But remember, I can never drain my batteries more than 50%, so this leaves me with a possible daily amp hour usage of 131.5 amp hours. Therefore, these solar panels which will supply 168 amp hours of electricity should supply enough, and in excess, of my actual battery storage needs. This is good for a number of reasons. As mentioned, the rating of the solar panels is its peak rating. The panels will most likely supply power below the peak rating much of the time. This is especially true on cloudy or rainy days. I may only derive 30% of the solar panels peak capacity on a cloudy day.
Georgia has a lot of cloudy days, especially in the winter, so I need to design my system with this in mind. It is good to choose panels that are well over the stated capacity of what your system needs. I also chose batteries that slightly exceed my anticipated need. Therefore, on a cloudy day I should be okay, but will need to economize by eliminating any non-essential power usage if it appears that my batteries are not being fully charged by the panels.
I am actually cutting things pretty close and may find that I would do better with an additional solar panel or battery. This will be best determined as I utilize the system and observe how it is performing.
There is one more thing that needs to be mentioned when choosing solar panels. That is the output voltage of the panels. Remember, you are storing your energy in batteries that are rated at 12 volts (unless your system is designed differently than mine). Therefore the power coming from the panels has to be converted to a voltage level that your battery can handle. It is the job of your Solar Charge Controller to make sure that the solar panels do not overcharge your batteries and damage them.
Charge controllers come in two main flavors. These are PWM (Pulse Width Modulation) Charge Controllers and MPPT (Maximum Power Point Tracking) Charge Controllers. The MPPT controllers are much better at extracting the maximum power from your solar panels and delivering it to your batteries. They can give you as much as 20% more power delivery than the PWM controllers. Another advantage is that the MPPT controllers can handle a much higher input voltage coming from your solar panels. The PWM controllers are generally limited to a voltage of 18 volts or less coming into them.
As you might have guessed, the PWM controllers are much less expensive than the MPPT controllers. This is why I purchased PWM controllers. Because I purchased PWM charge controllers to interface between my solar panels and my batteries, I needed to purchase solar panels that would not exceed the input voltage the charge controllers could handle. I have found that most solar panels rated at 140 watts or less have a low output voltage level that the PWM controllers can handle. If you look at the specification of the panels I purchased you will note that there is an entry labeled “Vop=17.3. This tells me that the operating voltage for these panels is 17.3 volts. This is in range with what my PWM charge controllers can handle.
Please note that there are panels rated at 140 watts or below that exceed this voltage, so you need to check the specifications carefully. Additionally, I found one panel rated at 210 watts that had an operating voltage less than 18 volts which would also work with my controller, but this was a rare find. Generally, if you get panels in excess of 140 watts you will need an MPPT charge controller.
From the research I have done I have found that Morningstar makes some of the best rated solar charge controllers. They offer them in a range of capacities in both PWM and MPPT designs. You can find them on Amazon’s website. The charge controllers I purchased are sold by a company called HQRP.
http://www.amazon.com/gp/product/B002RY1Q4Q
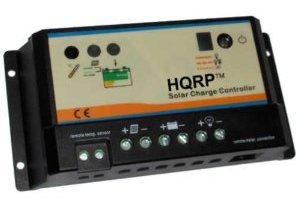
HQRP 20 Amp Charge Controller
Notice that this charge controller is advertised as a 20 amp charge controller. This is a key rating to make note of. I am going to hook two solar panels to each charge controller. The solar panels I purchased have a peak output rating of 8.1 amps each. Combined this is 16.2 amps. You need to make sure that the amp rating of the charge controller is higher than the combined amperage of the solar panels you will be connecting to it.
(One other note, if you hook multiple solar panels together and run them to a single charge controller, the panels should be identical so their electrical characteristics will be the same or you will likely degrade the efficiency of your system.)
The connections on this charge controller are pretty standard so I will describe them here.
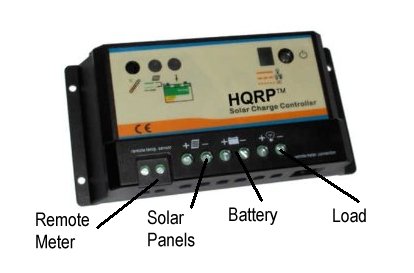
The first two connectors labeled Remote Meter are used to wire in a display that you can run to a convenient location that will give you information on your system. This information includes how much power is coming from your solar panels and how much charge is on your battery. This is important information to know.
The second set of connectors labeled Solar Panels is where you attach the incoming leads from your Solar Panels. Most Solar Panels sold use MC4 connectors. Generally you will find some very short cables extending from each solar panel that are terminated in a set of MC4 connectors, one male (positive) and one female (negative).
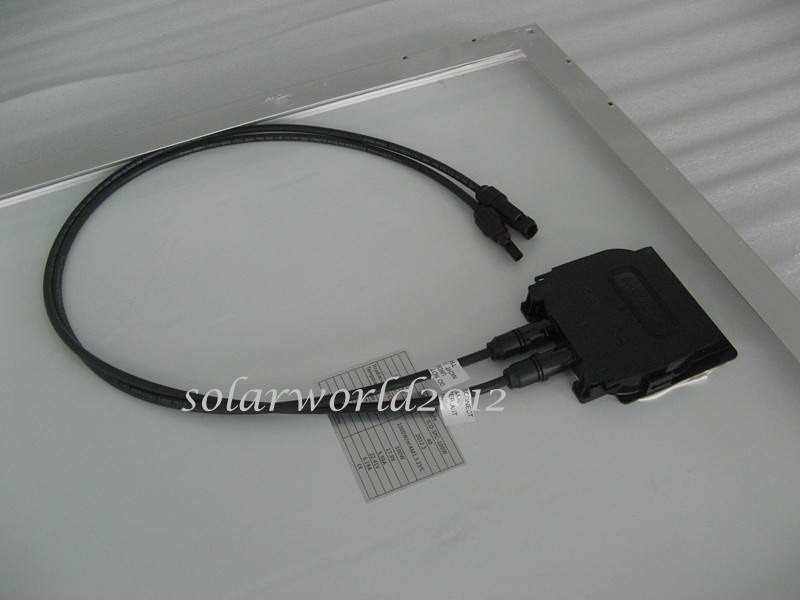
MC4 Connectors on the Back of My Panels
To hook the solar panel to the charge controller you will need an MC4 extension cable. I purchased some from Solar Penny. Their service was excellent. I received the cables two days after I ordered them and I placed my order on a holiday week-end.
http://www.solarpenny.com/Solar-Cable_c7.htm
What I recommend is that you calculate how far it is from your solar panels to your charge controller, then purchase a single cable that is twice the distance. Cut it in two right in the center, then use the ends with the connectors to attach to your panels. Take the cut ends and wire them into your charge controller. Keep in mind that the longer your cable is from your solar panels to your charge controller, the more resistance there will be in the cable. This will reduce the amount of electricity you ultimately derive from the panels, so keep you cables as short as possible and locate the panels as close to the charge controller and batteries as possible. Cables also come in differing gauges. You will find solar cable commonly sold in 8, 10, 12, and even 14 gauge wire (AWG). The lower numbers indicate thicker cables, and the higher numbers are thinner cables. 10 gauge, or even 8 gauge cables are preferable. If you push too much current through the thinner 12 and 14 gauge cables they may heat up, and will also give degraded performance.
In my case, I am hooking two panels together and then running them into the charge controller. Since I have only two wiring connectors on the charge controller for the solar panels I need to hook the wires coming off the two panels together in parallel. These parallel cable connectors are available on Ebay as well.
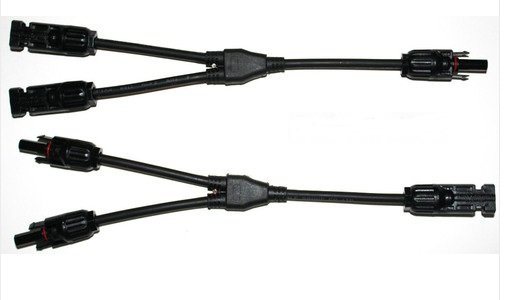
MC4 Parallel Connectors
Since the cables coming off my panels are only three feet long, I will need to situate the solar panels on the ground with the wired ends next to each other. I can then join them with the Y connector between them and run the cable from there to my charge controller.
Returning to the diagram of the Charge Controller, there are two connections to attach wires that will go to your battery. These will be used to charge the battery. They are labeled positive and negative. The connections should be pretty straightforward as your battery is also labeled positive and negative. Positive goes to Positive. Negative goes to Negative.
The last connections labeled “Load” are available in case you want to attach a 12 volt device to the charge controller without going through the battery first. This is optional and you may choose to not use it, but it is there. You could for instance wire in a cigarette lighter type of socket and then plug any 12 volt device that uses that type of connection directly to the charge controller.
This brings us to the last component of a solar battery system. This is the Inverter. Let us look at the complete system diagram one more time.
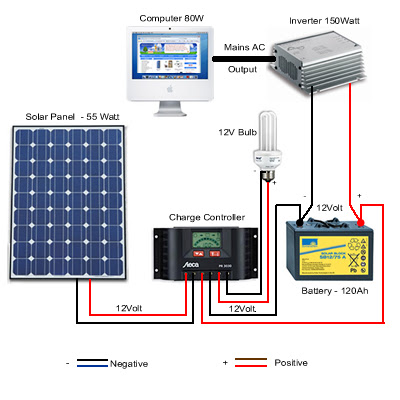
Solar Power System
We have looked at the Solar Panels, the Charge Controller, and the Battery. What remains is an inverter. This is only needed if you are planning to run appliances that require 110 volt AC electrical power. Because your battery supplies 12 volt DC power you cannot plug an AC appliance directly into it. You can only run 12 volt DC devices directly from the battery.
The inverter takes the 12 volt DC current and converts it to 110 volts AC. On one side of the inverter you will find electrical sockets just like those in your home. You can plug your appliances in to them. Inverters are rated by wattage. In the diagram above the Inverter is labeled as 150 watts. There is a computer plugged into it that is rated at 80 watts. You want to always make sure that your inverter is rated higher than the cumulative total of the devices you will be running simultaneously off of it. I recommend giving yourself a good buffer by purchasing an inverter with a significantly higher watt rating than the appliances you plan on running. Some inverters will begin to fail if you approach their maximum wattage rating. I have a small inverter that came with the 60 watt solar panels I purchased a few years back. Its alarm would sound whenever I plugged my laptop into it even though the inverter was rated at a higher wattage than my laptop.
In my trailer I have a freezer that uses approximately 120 watts of power, and a motor on my grain mill that is rated at 90 watts. If I run them at the same time they will use 210 watts of power. I purchased an inverter that is rated at 600 watts. That gives me plenty of buffer and if I need to run a higher wattage device on occasions, I will be able to do so.
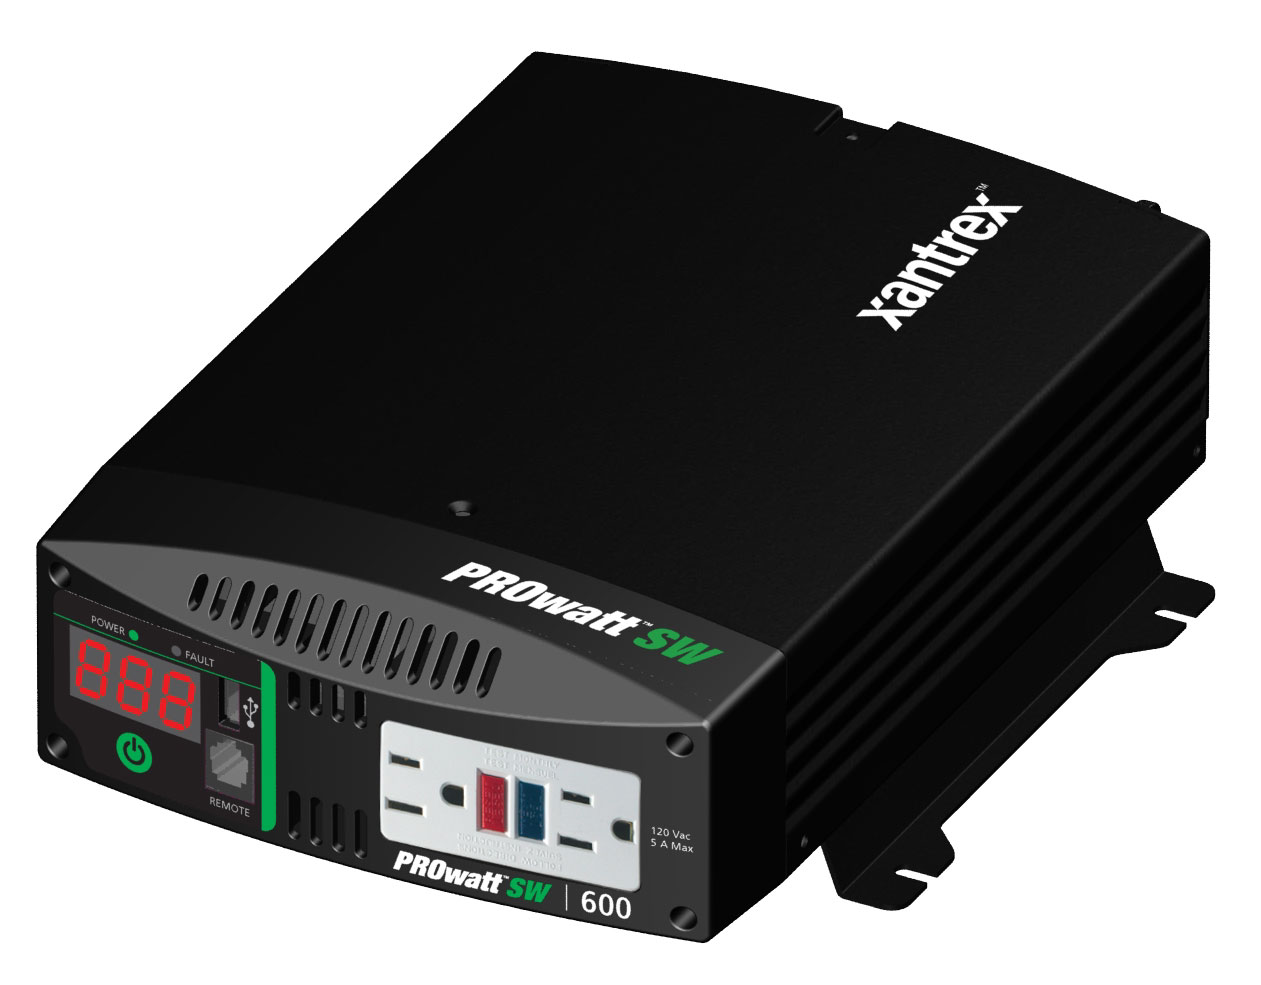
Xantrex Prowatt SW 600
Having done some research I found that the inverters available from Xantrex and Samlex are highly rated while being offered at reasonable prices. I purchased mine through Amazon.
Another thing to consider when shopping for an inverter is whether it is a modified sine wave inverter, pure sine wave inverter, or true sine wave inverter. The modified sine wave inverters are the least expensive, but they are not suitable for running sensitive appliances such as computer equipment, radios, and even some motors. The AC power waveform they output differs from the AC power your house gets from the electrical company and it causes trouble for some appliances. To avoid this problem you should purchase a well rated pure sine wave, or true sine wave inverter. The Xantrex inverter I purchased is a true sine wave inverter so I should have no problem running a computer with it.
One last note. It is recommended that you install fuses or breakers in your system. This is especially recommended between your battery and your inverter. Inline fuses can be purchased through Amazon, Ebay, or other places. The fuse holder can be wired into your cable that runs between the battery and inverter. This is needed to keep from burning up your equipment (or your home or RV) in the case of a catastrophic short. The size of the fuse would vary according to your battery capacity. You can find some suggestions at the following website forum.
http://www.rvforum.net/SMF_forum/index.php?topic=26699.0
Some people recommend that you place a fuse between every two components in your system. This would mean you need a fuse between the solar panel and charge controller; between the charge controller and the battery, and between the battery and the inverter. I am not certain whether this is absolutely necessary. I plan only to put a fuse between my battery and inverter, but you can investigate this further for yourself.
Well, there it is. This is my description of the components of a solar array power system using the four main components of Solar Panels, Charge Controller, Battery, and an Inverter.
I will add my disclaimer here. I am not an electrician. I am simply a Do-It-Yourself individual who has worked on his own systems to save money. If there are trained electricians out there who read this and note anything amiss, please send me a note or use the comment field to share your advice. Both myself, and those who read this blog to obtain information, will appreciate your efforts.
NOTE: I have posted an updated series on solar power systems that presents many things I have learned since I wrote this post in 2012. I recommend that series to anyone interested in constructing a solar power system.
Solar Ruminations – If at First You Don’t Succeed
https://heart4god.ws/wordpress/2014/09/solar-ruminations-if-at-first-you-dont.html
Solar Ruminations – In Defense of Austerity
https://heart4god.ws/wordpress/2014/09/solar-ruminations-in-defense-of.html
Solar Ruminations – Alternative Living
https://heart4god.ws/wordpress/2014/10/solar-ruminations-alternative-living.html
Solar Ruminations – More Methods of Alternative Living
https://heart4god.ws/wordpress/2014/10/solar-ruminations-more-methods-of.html
Solar Ruminations – Some Assembly Required
https://heart4god.ws/wordpress/2014/10/solar-ruminations-some-assembly-required.html
And there are some additional updates.
Home Improvements and Faith Works
https://heart4god.ws/wordpress/2015/03/home-improvements-and-faith-works.html
A Season of Repair – Now!
https://heart4god.ws/wordpress/2015/04/a-season-of-repair-now.html
Home Works
https://heart4god.ws/wordpress/2015/09/home-works.html
Heart4God Website: http://www.heart4god.ws
Parables Blog: www.parablesblog.blogspot.com
Mailing Address:
Joseph Herrin
P.O. Box 804
Montezuma, GA 31063


I really like the information provided in this article and I really like the way you have explained each and everything so well. Very well done with the article, hope that you will continue to do posting
Lots of good info – I am trying to set a system up now. I am a nurse and we did NOT learn any thing about this in nursing school.